There are a variety of turning tools you can use in your workshop. These tools include the Bowl gouge, Spindle roughing tooluge, and Faceplate gouge. Others can be specialized to work with specific wood types, such as oak, walnut, and other softer woods. These are some helpful tips to help you choose the right tools. Listed below are some of the most common types of turning tools. You should carefully consider your options before making a decision.
Turning faceplate
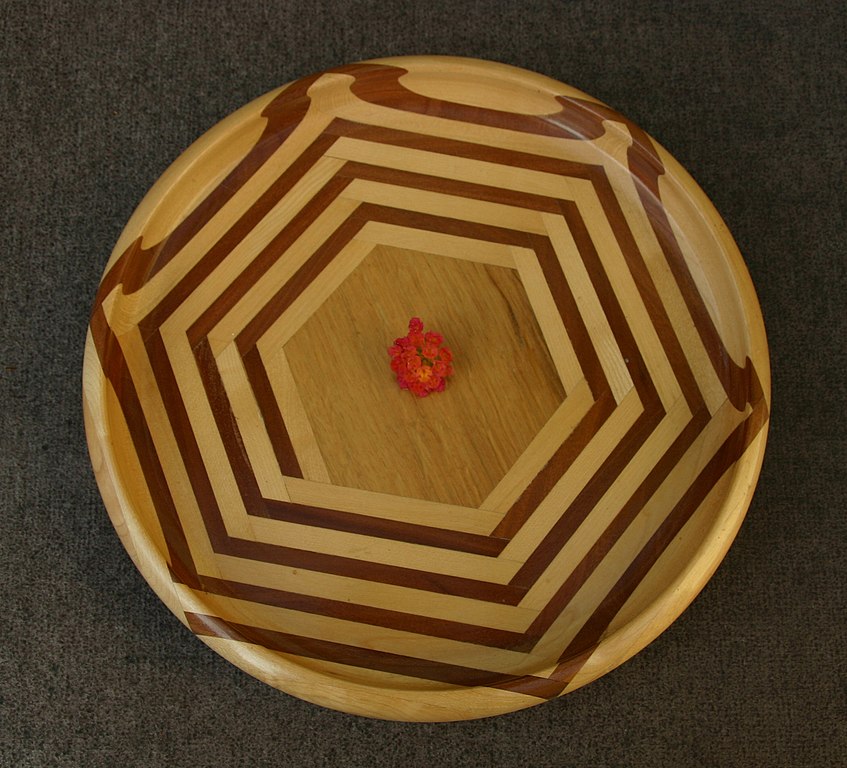
Woodworking techniques can include the use of a faceplate. These faceplates can be either simple moulds or complex designs that are carved into wood. Here are some examples. The trophy base is made with straight sides, while the rosette features deeper beads and coves. Both require great care and attention to detail. You can read the following to find out more about faceplate turn.
Cuts will be affected by the angle at which a piece of equipment is placed on the work. The cleaner the cut, the greater the shear angle. A square tool will cut the wood but a 45deg angle will make it easier. A 45-degree angle gives the wood a more smooth finish and makes it easier to cut. A gouge or sharpening stone can improve the appearance of your cut.
Spindle roughing tool
A spindle roughing chisel is used to aggressively reduce square or rectangular blanks of spindle into round cylinders. The spindle roughing tool should not be used for turning bowls, unlike the skew-chisel. Its cutting blade digs into the ends grain. It can still be used for cross-grain tasks, such as turning bottle stopspers.
When using a spindle roughing gouge, you should avoid cutting the cross grain. This tool has a 45 degree geometry, so it is not recommended that you cut across the grain. Also, the tool size and flute shape can cause trouble. This tool should not be used unless you have extensive experience in woodworking. Whether you're a complete beginner or a seasoned pro, here are some tips to keep in mind.

Use the right angle first. You should use your back hand to control the spindle and your left hand to guide the tool. To clean up any dust, use your index finger. Next, ensure the cutting edge is in contact with the wood. The cutting edge will leave shavings behind, which indicate the proper position. Move on to the next stage after the wood is cut.
Bowl gouge
A bowl gouge can be used to remove material from the bowl's interior. This tool is made out of high-speed stainless steel and has a brass ferrule. Adjust the height of the tool-rest to make the bowl shape you want to use the bowl gouge. Then, swing the gouge handle forward and backward until it reaches the desired depth and width.
A variety of sizes are available for a bowl-gouge. A bowl gouge of approximately 1/2" diameter is best for beginners. For finishing cuts, wood bowl turners with more experience can use a 3/4" gouge. A larger gouge with a greater diameter can be used for large bowls, and can also be used as a plow. Different sizes of gouges have different grind profiles. A gouge's cutting edges is the area that surrounds the bevel. Rub your finger against the gouge to check its sharpness.
Skew chisel
You must learn how to properly use a Skew Chisel for turning wooden boards. First, you need to learn how to make taper cuts. Use the heel of your skew's edge to adjust the angle of your chisel's contact with the spindle. Ideal for V-cutting and planning, as well forming beads, is a 20-30 degree angle.
You will be able to create V-grooves quickly and cleanly by using a skew saw chisel when turning wood. You will need to place the toolrest high so that the long tip of the tool can be used to mark the centerline. Then, elevate the handle to make the groove deeper. Next, alternate between the right and left cutting motions until you reach the desired groove depth. Once you have completed the cut roll the skew’s endbevel to the side.
FAQ
What kind of tools are used to carpenters?
The most common tool used by carpenters is a hammer. A hammer helps to carpenter pound nails into the wood. It also helps them hold pieces together while they are working on a project. Other tools include clamps.
How can a beginning woodworker make a living?
Many people learn how to make furniture in order to set up an online business. However, if you're just getting into furniture building, there are other options than selling on Etsy. You could sell at craft fairs or local events. Offering workshops could be another option for those who are interested in learning how to build their furniture. Consider offering your services if you have previous experience as a builder or carpenter.
Where can I buy hardwood lumber?
Home Depot offers hardwood lumber. They offer a wide range of wood products including flooring, cabinets, furniture and more.
A large variety of engineered hardwoods is available to them, including Ipe (Araucaria Angustifolia), Brazilian Cherry and Peau d'Arco.
You can find these woods for sale online by searching "hardwood lumber" on Google.
How much should a hobbyist invest to get started?
If you're looking to start your own woodworking business, you'll probably need some capital to buy the necessary tools and supplies. You can start by purchasing a small table saw and drill press as well as a circular saw, circular saw, jigsaw and sanding machines. These items aren’t too expensive so you won’t have to break the bank.
How much money do you need to get going?
Because every project is unique, there aren't exact numbers. These factors will help you get an estimate of how much money is needed.
-
Material costs
-
Tools and equipment
-
Time spent on the Project
-
The hourly rate
-
What is your expectation for profit?
-
Hire help
Start small, if possible. You can make simple boxes or picture frames if you're just getting started. As you gain experience, more difficult projects will become possible.
Statistics
- If your lumber isn't as dry as you would like when you purchase it (over 22% in Glen Huey's opinion…probably over 10-15% in my opinion), then it's a good idea to let it acclimate to your workshop for a couple of weeks. (woodandshop.com)
- Overall employment of woodworkers is projected to grow 8 percent from 2020 to 2030, about as fast as the average for all occupations. (bls.gov)
- The best-paid 10 percent make $76,000, while the lowest-paid 10 percent make $34,000. (zippia.com)
- Average lumber prices rose about 600 percent between April 2020 and May 2021. (familyhandyman.com)
External Links
How To
How to stain wood
Staining wood is the process of applying chemicals to the wood's exterior, which alters its color. This chemical reaction causes the wood to change from white to brownish red. Although oak is the most popular type of wood to stain, there are many other types that can be used.
There are many options for applying stains to wood surfaces. Mixing the stain in a solvent such as turpentine and spraying it onto the wood is one method. Other methods use a solution of water and dye applied directly to the wood. You can also mix stains with varnishes or paints so that they become part the finish coating.
Preparing the surface is the most important step in staining wooden surfaces. You must clean the wood well to remove any grease or dirt that might interfere with the application of the stain. Sanding can smoothen out scratches and uneven spots. Then you must decide what kind of stain you want to use. Penetrating stains are different from non-penetrating. Penetrating stains penetrate deeper than non-penetrating stains, which makes them great for dark colors like mahogany. Non-penetrating oils work best when used with light colors, like maple.
Once you have decided on the stain type that you want, get your tools ready. The best tool for applying stains is a paintbrush. It allows you to evenly distribute the liquid over the surface. To remove any stains left behind after painting, you will need some rags. You should have enough containers to store the various components of the stain mixture if you intend to mix it yourself.
Once you have prepared your materials, start by cleaning the area where you plan to stain the wood. Use warm water and soap to clean away dirt and dust. Use a dampened rag and clean water to wipe the furniture. Be sure to get rid of all loose material, especially if staining is planned for darker wood.
The stain should be applied next. The stain can be applied by spraying or brushing the stain onto one end of the furniture. Work slowly and carefully, moving back and forth along the grain of the wood until you reach the opposite end. Keep the stain from dripping off the wood's surface. Before you proceed with the next steps, let the stain dry completely.
Clear polyurethane is used to protect the painted surfaces. Three coats of polyurethane sealing agent are required. Allow the third coat to dry overnight before sanding the final coat.